Our team of eDiscovery specialists tackle your frequently asked questions and pressing "in the trenches" legal tech topics.

Tuesday's Tip #2 - Transposing Data:
Converting rows to columns (or vice versa) is called transposing and it’s a feature available in our trusty old friend, Excel. There's a little trick I find particularly useful when I need to provide a report on which fields are included in a load file, or when I need to cross-check load files received from another party against the list of agreed fields on a document exchange protocol.
Ok, so why would anyone need to transpose their data?
Reorganizing data in an Excel spreadsheet can be a pain, especially when you want to make changes that a simple copy-and-paste won’t fix such as quickly converting your header row into a column or list.
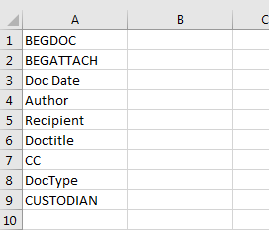
For example, from this:

to this:
Follow my simple 3-step process below and get back a few minutes in your day!
STEP #1: Copy the row or column of data you want to transpose
*NOTE: You must use Copy or Ctrl + C (it doesn't work with Cut or Ctrl + X)

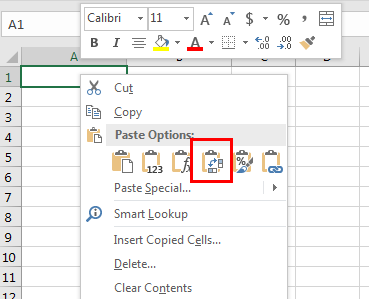
STEP #2: Choose a new location (either in the worksheet or in a new worksheet) where you want to paste the transposed data. Right click on the empty cell and the following paste options should appear. Then select Transpose ![]() .
.
STEP #3: Et Voilà! Your data should now be transposed into a column.
Still having trouble transposing your data? We can help, contact us for assistance.
 In Case You Missed It
Check out Tuesday's Tip #1:
We're featuring a new Tuesday's Tip on the 3rd Tuesday of every month. Subscribe to our blog to stay up-to-date and receive email notifications.

Do you have a question for our team or a topic you'd like us to cover? Comment below or tweet us using #ReDTuesdaysTip.